Here are the 3 monsters all in a row:
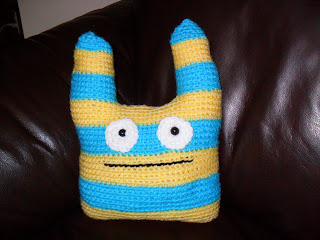
All three monsters were made using patterns by Stacey Trock. They can be purchased from her website. The striped monster, Mixtro, is available for free on Ravelry.
Mixtro
First, I used 2 main colors and switched back and forth to make the main body. This pattern is a little bit different from others I had previously done for a couple of reasons. It is done in the round, but it is started by using a chain, rather than a magic circle. The ears required me to learn a new trick as well, only going partway through the round, but they were relatively simple.
Next, I added the eyes. They are just a simple crochet in the round, 12 mm eyes placed in the middle, and then the eyes are stitched onto the body.
Then, I added the mouth. I just stitched across with black acrylic yarn.
Finally, I stuffed my monster and sewed it shut across the top between the ears.
Mr. Toothy
The original Mr. Toothy has a felt tooth, but I chose not to add the tooth. It's all made in the round, and is fairly simple to make. (I'll show more of the parts with the Yeti below.) It includes 2 ears, 2 arms, and 2 leg parts.
I made this monster using a size H needle, 2 colors of acrylic yarn (body and mouth), 12 mm eyes, stuffing, and a needle.
First, the legs are made to a certain point, and then stitched together. Next, stitch around the body for some rounds. Then, the arms are stitched into one of the rounds, and then a couple more plain rounds. Finally, you do reducing rounds until closed. The ears are stitched onto the head, rather than being stitched into the round. The mouth is just a plain stitch using black yarn.
Yeti
For this Yeti, I used a cotton blend yarn for the body and a gray acrylic yarn for the face. I also used 12 mm eyes, stuffing, crochet hooks, and a needle. For the body, I used a size K hook, and I used a size H hook for the face.
You can see all of the parts and the yarns in the following photo.
It is easier to see in the above photo how the legs were started separately, and then later joined together. As you can see, I am still using my super cheap paperclip stitch markers. I like them.
You might not see it at first glance, but I used the same pattern for the Yeti as I did for my Mr. Toothy.
The only differences are the lack of ears and the face. For the Yeti face, I just did a number of increase rounds.
I have to give a shout out to my wonderful husband. He did a great job for my birthday this year. He got the bike that I had requested, but also surprised me with my favorite flowers. Soooo pretty! We also had a great evening going to dinner and a movie.


These are so cute!! Thank you so much for sharing at our Simply Create Link Party!
ReplyDeleteMelissa
redflycreations.com